Continuous Integration and Continuous Deployment (CI/CD) are essential practices in modern software development. They help you automate testing and deployment, catch bugs early, and deliver code faster and more reliably.
If you’re a beginner, GitHub Actions is one of the easiest ways to set up a CI/CD pipeline — right from your GitHub repo.
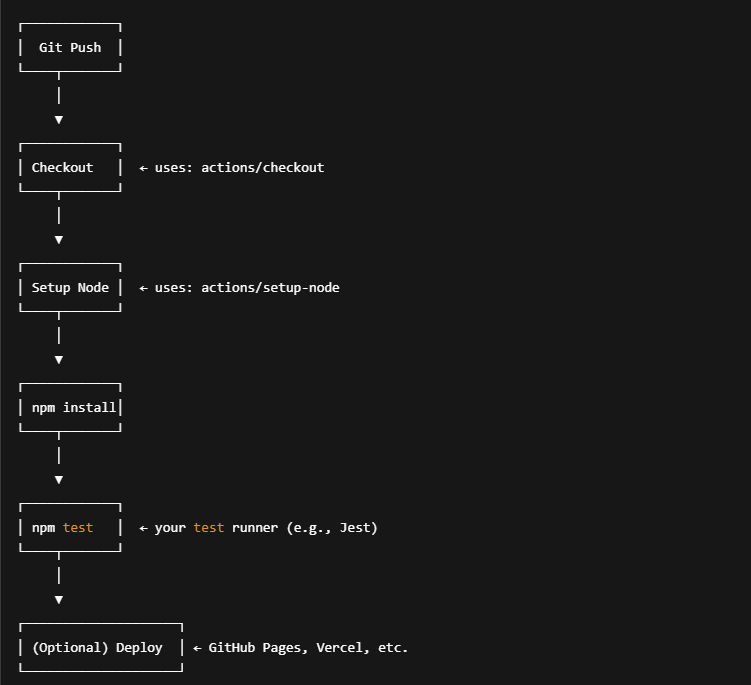
In this guide, we’ll walk through building a basic CI/CD pipeline in four clear steps using GitHub Actions.
💡 What is GitHub Actions?
GitHub Actions is GitHub’s built-in automation tool that allows you to run workflows when certain events happen in your repository — like when you push code or open a pull request.
You define these workflows in YAML files under the .github/workflows/ directory of your repo.
✅ What You’ll Need
- A GitHub account
- A repository with some code (we’ll use a simple Node.js project for example)
- Basic knowledge of Git and GitHub
🔧 Step 1: Set Up Your Project and Create a Workflow File
- Go to your GitHub repository
- Create a new folder:
.github/workflows/ - Inside that folder, create a file called
ci.yml
This YAML file defines your pipeline.
Here’s a simple example for a Node.js project:
yamlCopyEditname: CI Pipeline

on:
  push:
    branches: [ "main" ]
  pull_request:
    branches: [ "main" ]

jobs:
  build-and-test:
    runs-on: ubuntu-latest

    steps:
    - name: Checkout code
      uses: actions/checkout@v3

    - name: Set up Node.js
      uses: actions/setup-node@v3
      with:
        node-version: '18'

    - name: Install dependencies
      run: npm install

    - name: Run tests
      run: npm test
⚙️ Step 2: Trigger the Pipeline Automatically
The on: section defines when your workflow runs. In this case, it will trigger on:
- Code pushed to the
mainbranch - Pull requests targeting the
mainbranch
This is usually enough for most beginner setups.
🧪 Step 3: Add Automated Testing
The npm test step assumes you have a test script defined in your package.json file:
jsonCopyEdit"scripts": {
  "test": "jest"
}
If you’re not using Jest, change this to match your testing tool (e.g., Mocha, Vitest, etc.). GitHub Actions will run this automatically when code is pushed.
🚀 Step 4: Add Deployment (Optional for Beginners)
To complete your CI/CD pipeline, you can add deployment. This might be:
- Uploading to a server via SSH
- Deploying to Vercel, Netlify, or GitHub Pages
- Publishing a Docker image
Here’s a very basic example of deploying to GitHub Pages:
yamlCopyEdit- name: Deploy to GitHub Pages
  uses: peaceiris/actions-gh-pages@v3
  with:
    github_token: ${{ secrets.GITHUB_TOKEN }}
    publish_dir: ./dist
Of course, deployment will vary depending on your hosting provider and app type. For beginners, you can skip deployment at first and focus on testing.
✅ Recap: CI/CD Pipeline in 4 Steps
- Create
.github/workflows/ci.ymlin your repo - Define events to trigger the workflow (
push,pull_request) - Set up your environment and run tests
- (Optional) Add a deployment step
📌 Final Thoughts
CI/CD might sound intimidating at first, but GitHub Actions makes it approachable and powerful — even for beginners. As your projects grow, you can expand your pipeline with steps like linting, building Docker images, or notifying your team.
Start simple, build confidence, and iterate. Automation is your friend!